

It's not that complicated a process, but if you have an old motherboard without NVMe support and you want to use a disk for booting the OS, then it's more complicated. If your bios supports UEFI boot and you have an AMI bios, then the following lines will tell you how to do it.
I recently wanted to buy a new SSD drive for my son, and since I also wanted to speed up the transfer speeds, I looked for the NVMe M.2 variant. But since my son's motherboard did not have a connector for M.2, I had to check on the Internet how this is solved. I found out that it's enough to buy a PCIe adapter, which easily makes up for the absence of that connector. Done, disc and adapter ordered. What was but my disappointment when I found out that the bios does not see the new disk! Damn I didn't think of this. A bios firmware update will save me, I tell myself reassuringly, and I'm already heading to the Asus website. After while my enthusiasm fades out when I find out that my bios is in the last possible version that Asus has ever released. What now? I'm asking Uncle Google again…
After a while I find that there will probably be some option, but will it work for me too?
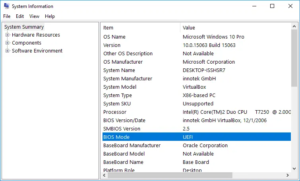
I have UEFI bios support, AMI bios too, the OS is Win 10, which by the way is also important that the OS itself supports NVMe!
So I carefully read the forum (the link is below), what and how, how others turned out, and my optimism grows. I will not give the detailed procedure itself here, I would rather mention what you will be dealing with, because there are several options for each step and something will suit everyone differently.
Step 1: BIOS modification
- If you are lucky, you will find the bios for your motherboard already modified on the forum. But make sure it's right for you. Otherwise, you risk irreparably damaging your computer, see warning below in step 2. If you didn't find, you need to download your current bios from flash memory or the internet. Here's a small recommendation: update your bios to the latest version before doing your own modification
- Therefore, in order for the bios to recognize the disk at all, you will have to add modules that will ensure this support. Fortunately, the authors of that manual took care of this and you just need to download the module and insert the module into the UEFI bios according to the instructions.
- Next, it is checked whether the insertion was successful, so that nothing else is damaged.
Step 2: flashing BIOS
Disclaimer
This step can permanently harm your computer, making it impossible to repair it yourself. I disclaim any responsibility for any such damages and please know that you do so at your own risk. YOU HAVE BEEN WARNED!
Use the utility of your choice to update the bios. Some bios can only be updated with signed fw, but there are methods to cheat this. This step is the most critical, if you've done something wrong and the utility doesn't detect it, you risk damaging your computer. Also, if the power black out during the update, even if it is only for a few minutes, then this damage you computer too. If this happens, you need to program the flash rom with a hardware programmer.
Step 3: OS installation
Updating the bios itself may not show any change in the disk selection, you certainly won't see the name of your new disk there. PATA or PATA SS may now appear there, but if there is no OS on the disk in UEFI mode, the system will most likely not start.
Note: Some NVMe SSDs like Samsung’s 950 Pro SSD are natively bootable in LEGACY mode (CSM and loading of Option ROMs has to be enabled within the BIOS), because their Controller chip contains its own NVMe supporting Option ROM module. If you are unsure what mode your Windows is you can use this guide.
If you have Windows on an old disk in UEFI mode, all you have to do is clone the system. For this, you can use, for example, the Macrium Reflect program, which can clone a disk in its free version. Just don't forget to modify the disk partitions in case of different capacities of the new and old disk.
Now in the bios set the boot priorities to Boot Manager + new disk name and you're done.
The procedure will be somewhat more complicated if your existing Windows ran in Legacy mode. To switch Legacy to UEFI mode, you need to convert the system partition from MBR to GPT type. I will not describe how it is done in detail, there are many ways and there are many instructions. You can use Partition Manager from EasyUS, which can handle this, or system tools in Recovery mode, see this guide. It is recommended to back up the disk before the actual conversion! Of course, it's not as dangerous as updating the bios, but sometimes it can happen that something goes wrong. For example, conversion is not possible if your disk has more than 3 partitions. After conversion, proceed with cloning, see previous paragraphs.
If you decide to fresh install of your OS, you must disable Legacy boot support in the bios by disabling CSM and setting UEFI boot mode before the actual installation. This will ensure that the Windows installer installs everything you need. Then again just select the boot priority for the new disk in the bios and you're done.
References:
- https://winraid.level1techs.com/t/howto-get-full-nvme-support-for-all-systems-with-an-ami-uefi-bios/30901
- https://www.easyuefi.com/resource/check-windows-is-booted-in-uefi-mode.html
- https://answers.microsoft.com/en-us/windows/forum/all/convert-an-existing-windows-10-installation-from/aa8c2de3-460b-4a8c-b30b-641405f800d7